Even with the preceding chapter, the Hogan Swing 3.0, it is still hard to bring up the club, especially the driver. There must be a way to create a swing that is automatic, the same way I putt now - after aiming, it is a mechanical movement of the shoulder doing the backswing of the putter and the hands moving forward for the hit, without even thinking of the target. Today, I went to the driving range and only brought the driver. I told myself that I will just keep on hitting it until I find that mechanical swing.
After a lot of balls hit, I found that I can bring the driver back with my right hand (see the previous posting for instructions) and just like the short irons, be aware of the face when bringing it back. And without even thinking of the plane, just bring the driver to the top where the right arm will be tightly haulted by the body. The hit is, of course, the left hand but naturally done to maximize the AJ force.
The preceding turned out to be useless when employed during play. What held up is the visualization of the plane. Also, by making the early cock swing, the visualization of the plane may become easier. This EARLY COCKING routine must be further studied.
The early cocking is like the making a abbreviated pitch within the swing. The early pitch visualizes how the club face is going away from the ball. The shoulders takes over afterwards. The hit is done by the shoulders and the "little pitch" hitting the ball is automatic.
Friday, June 15, 2007


Friday, June 08, 2007
The Hogan Swing 3.0
We can call it the Hogan 3.0 Swing. It entails the required grip, the cupped left hand and the body turn.
First let us talk about the set-up. It should be the standard Hogan set-up with the hands falling straight down while holding the club - with the L formed by the arms and club very apparent. The grip is a solid grip with the left thumb snugly fitted along the right palm line. The V of the right hand prominently pointing to the right shoulder. The right palm is not exactly in the shake-hand position, more pointed to the 2 o'clock position. The left hand is much closer to the shake-hand position. The palms are not really parallel - the left palm is more or less perpendicular to the ground at 12:00 o'clock.
Why is the right hand positioned like this? Because this is the position where the right hand can naturally flick with the wrist the club along the plane - even in a slow-mo way.
At address, the plane is visualized cutting throught the equator of the ball. At that moment when the equator of the ball along the plane is visualized, the right wrist flips the club deliberately along the plane. Somewhere at hip level, when the club shaft merges with the plane, the left arm takes over and continues the upswing - the right palm merely cradling the club like a waiter with his tray on the right hand. At the top, the left shoulder gives that extra twist.
At the same time, the twisted shoulders releases back towards the ball - and the weight fully going to the left. As the arms passes the ball, the left cupped back hand "paints" the ball. Then, after passing the ball, the body jerks to face the ball - imparting that "baseball bat hit" of the club head. All throughout the downswing, the left hand is in control - the right hand merely tags along (it is needed only in the backswing).
Wednesday, May 23, 2007
Putting / Chipping Version 2.0
The technique no longer follows the intent - use the big muscles for consistent accuracy. That one did not work for me, mainly because of misalignment errors introduced by it - as revealed by the theory of the "Isosceles Triangle" and corrected by the "Separation of Church and State".
The putting is MECHANICAL and the procedure now should be:
This is the same technique for chipping.
The putting is MECHANICAL and the procedure now should be:
- While keeping the ball in front (perpendicular to the putting path) and looking at the hole ahead, do several practice putts to get the feel for the length of the putt and to feel the RHYTHM needed. Remember to think the ball rolling there to the target spot.
- Come back to the set-up spot with both feet together. Lay down the club with the "LEFT" hand square to the target (Ronald's tip).
- Read the putt, decide on the target spot on the green or the hole. Commit to the target by aligning the shoulders to the target line and opening the two feet.
- Bring the putter back with the SHOULDERS - "without" thinking about the target spot - execute the same rhythm felt and ...
- Without missing a beat, let the ARMS come back pendulum style to and through the ball - but the SHOULDERS MUST CONSCIOUSLY STAY where it was at the finish of the takeaway.
This is the same technique for chipping.
Sunday, May 06, 2007
Wind and Unwind
How big of a back swing will I do? How do I know when enough is enough?
One thing, as far as the back swing for old farts, there is no "enough" back swing. Go as much as you can. But what should you achieve for? I would say that when the right hand brings the club up, it should try to bring the club aligned with the plane. The shoulders should then wind up as much as possible - the club along the plane and the shoulders wrapping around the spine. The down swing should just feel like unwinding the shoulders. This should be automatic with no conscious steering - one way or the other.
How do we execute this wind and unwind technique? Well, one you have set up, where the club is left flat on the ground, the arms falling down straight to the grip, almost forming an "L", the right hand in control and dot on the muscle of the right hand is felt - then it is just a matter of looking at the plane and winding the shoulders parallel to it. This motion will bring the club along the plane automatically. Wind of the shoulders continues up to the desirec tautness.
The next is up to you. By the way, this is an extreme implementation of Hogan's plane.
One thing, as far as the back swing for old farts, there is no "enough" back swing. Go as much as you can. But what should you achieve for? I would say that when the right hand brings the club up, it should try to bring the club aligned with the plane. The shoulders should then wind up as much as possible - the club along the plane and the shoulders wrapping around the spine. The down swing should just feel like unwinding the shoulders. This should be automatic with no conscious steering - one way or the other.
How do we execute this wind and unwind technique? Well, one you have set up, where the club is left flat on the ground, the arms falling down straight to the grip, almost forming an "L", the right hand in control and dot on the muscle of the right hand is felt - then it is just a matter of looking at the plane and winding the shoulders parallel to it. This motion will bring the club along the plane automatically. Wind of the shoulders continues up to the desirec tautness.
The next is up to you. By the way, this is an extreme implementation of Hogan's plane.
Friday, May 04, 2007
How important is the L angle?
If it leads to shanks, it is priceless! I have this bad habit of straightening my arms in relation to the club shaft that when I forget, the resulting shanks will put me down miserably. Even if I know the correction, the feeling of insecurity pervades for a long time. I should explain this section better and with more detail.
Wednesday, April 18, 2007
Time to go to the next level - no swing thoughts?
It has been written by a lot of professionals that the ultimate goal is for muscle memory to take over and that the swing mechanics should be forgotten in order to achieve the highest level of golf skill.
Well, theoretically, I feel I can do this. When practicing the swing, I can feel that my whole focus when executing the swing is the upper body - in particular - the center part of the chest. I feel that my entire power is focused on that small part of my chest, the center bone of the chest, the sternum. That must be a technical term for that part of the skeleton. This is that part of my body I feel hits the ball.
Can I forget everything and just feel my way through the swing? The driving range reminded me that the answer is NO and it is because the cocking and bringing the club by the right hand up is a key ingredient of my swing. The downward hit is done by the chest but the upswing must be done by the right hand.
The reason and answer to this, I concluded can be found in the other topic - The Isosceles Triangle. I MUST RESOLVE NOT TO IMPROVE ANYMORE IF IT WILL ENTAIL A CHANGE IN MY CURRENT SWING. My swing is simple at the moment. Setup, bring the club up with the right hand, shoulders twist as much as possible, shoulders hit!
Well, theoretically, I feel I can do this. When practicing the swing, I can feel that my whole focus when executing the swing is the upper body - in particular - the center part of the chest. I feel that my entire power is focused on that small part of my chest, the center bone of the chest, the sternum. That must be a technical term for that part of the skeleton. This is that part of my body I feel hits the ball.
Can I forget everything and just feel my way through the swing? The driving range reminded me that the answer is NO and it is because the cocking and bringing the club by the right hand up is a key ingredient of my swing. The downward hit is done by the chest but the upswing must be done by the right hand.
The reason and answer to this, I concluded can be found in the other topic - The Isosceles Triangle. I MUST RESOLVE NOT TO IMPROVE ANYMORE IF IT WILL ENTAIL A CHANGE IN MY CURRENT SWING. My swing is simple at the moment. Setup, bring the club up with the right hand, shoulders twist as much as possible, shoulders hit!
Wednesday, April 04, 2007
The Grip and Setup
Contrary to popular beliefs and teachings, the primary purpose of the grip is to "launch" the club head to "orbit". Consequently, if this maneuver is not precisely angled correctly, the club head will orbit but will not be able to successfully land smoothly. This may be an unusual analogy but the swing - up swing and down swing - is directly related to the movement of the shoulders. Therefore a smooth and correctly angled takeaway is necessary to achieve an accurate ball flight.
In addition to the grip, the set-up is also necessary. Set up relates to the position of the arms and hands to the club grip, the club shaft position and its height.
Additionally, the right pinching fingers (thumb and forefinger) need special mention. How tight should it pinch the grip? It should be tight enough to steady the club firmly (for pro-like consistency) but not too tight to encourage the right arm to takeover and derail the shoulder swing.
Here is a point by point instruction:
In addition to the grip, the set-up is also necessary. Set up relates to the position of the arms and hands to the club grip, the club shaft position and its height.
Additionally, the right pinching fingers (thumb and forefinger) need special mention. How tight should it pinch the grip? It should be tight enough to steady the club firmly (for pro-like consistency) but not too tight to encourage the right arm to takeover and derail the shoulder swing.
Here is a point by point instruction:
- Grip the club ala Hogan and lay the club head behind the ball.
- Drop the grip and let it stay where it wants to stay (gravity). The hands are directly below the chin. The club is more of a right angle than straight to the ball.
- Place the grip a little left just to make sure it lines up with the left arm.
- Now you should have that feeling that you can lift the club head with the right hand. It must be a nice and confident feeling.
- Feel that confident feeling; else start again.
Tuesday, April 03, 2007
Swing Plane Must Cross the Target Line
It is so easy to make the mistake that the swing plane perimeter is imagined as a circle and and the plane goes along the target line. However, this is far from the truth. In our mind, we should endeavor to hit the ball with an inside to outside intent, in effect, crossing the line.
When using the shoulders to throw the club towards the ball, make sure that you understand the actual path the clubhead takes depending on the length of the club you are using. For example, if you are hitting the wedges, you tend to send the clubhead digging to the ground. This is because your swing plane is so upright that it almost mirror the target line. However, if you are hitting the driver, you must throw the clubhead more from the ball to outside the target line. You are in effect throwing the clubhead to cross the target line. In reality, what happens is the clubhead never crosses the line but just stays a little longer on the target line. If not purposely thrown to cross the line, the clubhead would have just have immediately come around and leave the target line, thus giving the ball a glancing blow rather than staying with it longer.
So what to do, you would ask? Well, if one cannot do the latter suggestion (below), then one must make sure the club is thrown (by the shoulders) to cross the target line - in effect forcing it. However, if one can twist his shoulder far enough at the upswing - really twist - then the swing itself is automatically corrected because of centrifugal force and because of "over" swinging.
When using the shoulders to throw the club towards the ball, make sure that you understand the actual path the clubhead takes depending on the length of the club you are using. For example, if you are hitting the wedges, you tend to send the clubhead digging to the ground. This is because your swing plane is so upright that it almost mirror the target line. However, if you are hitting the driver, you must throw the clubhead more from the ball to outside the target line. You are in effect throwing the clubhead to cross the target line. In reality, what happens is the clubhead never crosses the line but just stays a little longer on the target line. If not purposely thrown to cross the line, the clubhead would have just have immediately come around and leave the target line, thus giving the ball a glancing blow rather than staying with it longer.
So what to do, you would ask? Well, if one cannot do the latter suggestion (below), then one must make sure the club is thrown (by the shoulders) to cross the target line - in effect forcing it. However, if one can twist his shoulder far enough at the upswing - really twist - then the swing itself is automatically corrected because of centrifugal force and because of "over" swinging.
Saturday, March 24, 2007
The Perfect Lie
The "perfect lie" is a very appropriate phrase since it is true no matter how you read it. You can say that golf pro teachers have been lying since they do not emphasize the importance of how the club lies at address but this is very important - even more important than the squareness of the clubface at setup. This is more so for the woods and hybrid clubs. These clubs have a bigger head and on setup, their bottoms must nicely sit on the ground - even if it means that the face is not square to the target. The main reason is it is a prime importance to allow the club to nicely slide along the ground in order to prevent any unneeded twisting that can ruin the shot and direction of the ball. So the other meaning to the "perfect lie" is make sure that the club squats perfectly on the ground.
When addressing the ball, ensure that the club touches and comfortable sits on the ground before gripping the club. It is not advisable to lift the club like Nicklaus - let it stay on the ground until it is brought up by the right hand to initiate the swing. Again, this is a requirement and very important for the woods and hybrid clubs.
Remember also that letting the club sit on the ground may make the club face look like it is no longer square to the target. This is alright. The main important thing is that your shoulders and hips are aligned to the target line. Do the same thing for the irons.
When addressing the ball, ensure that the club touches and comfortable sits on the ground before gripping the club. It is not advisable to lift the club like Nicklaus - let it stay on the ground until it is brought up by the right hand to initiate the swing. Again, this is a requirement and very important for the woods and hybrid clubs.
Remember also that letting the club sit on the ground may make the club face look like it is no longer square to the target. This is alright. The main important thing is that your shoulders and hips are aligned to the target line. Do the same thing for the irons.
Saturday, December 16, 2006
Pitching Version 2.0
Again you will notice here elements of the "Isosceles" and "Separation" techniques at work.
Essentially pitching in general is the same technique as the full swing (see Shoulders Version 2.0). The obvious difference is the swing plane which, instead of the shoulder to the ball plane, is hands to the ball plane. Consequently, it is a flatter swing. This technique is designed for high shots with full back spin.
Here is how to do it:
Essentially pitching in general is the same technique as the full swing (see Shoulders Version 2.0). The obvious difference is the swing plane which, instead of the shoulder to the ball plane, is hands to the ball plane. Consequently, it is a flatter swing. This technique is designed for high shots with full back spin.
Here is how to do it:
- Setup with weight favoring left side. The club is resting fully aligned with the left arm and the ball more to the right of center aligned more to the right foot.
- Visualize the low plane - hands to ball, parallel to the shaft. Because of the "Separation of Church and State" theory, the right hand INITIATES the swing by cocking the club shaft towards the two o'clock direction and bringing the club along the low plane. Somewhere at the early part of the takeaway and as soon as the club enters the plane, the shoulders take over swaying the club along the low plane, hip high - the body turning around the vertebrae. (Read the last pointer)
- Pivot (more like swaying) the body (not the shoulders since the plane is by the hips) around the hip high plane until the desired feeling (for the distance) is felt. This can be half, three quarters or partial swings - it is not necessary to go all the way.
- Again, make sure that the turn is full as signified by getting that "enough" feeling. (Read the last pointer)
- The shoulders make the hit by turning the upper body towards the ball along the hip-high plane.
- As in putting, rhythm must be established by making a connection between the upswing and the downswing.
Friday, December 15, 2006
The Shoulders Swing Version 2.0
Now is the time to visualize the golf swing as hitting the ball with the shoulders - all the other parts purposely ignored. After several practices and developing the previous chapters on the "Isosceles Triangle" and the "Separation of Church and State", I realized that a few written chapters need to be modified. WORD OF CAUTION - DO NOT FORGET THAT THE MAIN INTENT IS TO MENTALLY THINK OF THE SWING AS A SHOULDER SWING - the arms and hands just automatically executes by centrifugal force. The small wheel and the big wheel concept must be junked.
Here is how to do it:
Please do not be fooled that this section may not be important. At the moment, I would say this is the most important section that I have written.
The locked knee is a crucial part of it for it maintains the body's alignment to the target. The shoulders pivots around the knee - as far as it will go. This mental change, that is, having the focus on the weight of the upper torso while swinging is very, very important.
THIS IS REALLY A VERY SIMPLE MOVE AND LEAVES YOU WITH THE FEELING THAT YOU EXECUTED TIGER'S SWING. MINUTE CHANGES TO ACCURACY IS ACHIEVED BY APPLYING THE THEORY OF THE ISOSCELES TRIANGLE.
Here is how to do it:
- Standard setup for targeting purposes - feet, shoulders aligned. However, the club is resting fully aligned with the left arm - to the point that the hands rest to the right of the head (vs. directly below).
- Feel the right thumb and forefinger wrap and resting on the club. Feel the right palm comfortably sitting on the left hand. Right fingers are not jammed towards the left fingers - it is gripping comfortably the club. The right hand will actively lift the club like a hammer towards the two o'clock direction.
- Be consciously aware of the knee-locked right leg.
- Firm up the left arm and hand.
- Because of the "Separation of Church and State" theorem, the right hand INITIATES by cocking the club shaft towards the two o'clock direction. Somewhere at the early part of the takeaway, the shoulders take over finishing the up-swing. (Read no. 10)
- Pivot the shoulders right locked leg until the left muscles is pulled all the way and the left shoulder is way under the chin. Of course, for half or partial swings (as in pitching) - it is not necessary to go all the way.
- Again, make sure that the turn is full as signified by the left shoulder hitting the chin.
- The shoulders make the hit by moving the weight and turning towards the ball.
- The weight movement should automatically force a reverse C finish.
- As in putting, rhythm must be established by making a connection between the upswing and the downswing.
Please do not be fooled that this section may not be important. At the moment, I would say this is the most important section that I have written.
The locked knee is a crucial part of it for it maintains the body's alignment to the target. The shoulders pivots around the knee - as far as it will go. This mental change, that is, having the focus on the weight of the upper torso while swinging is very, very important.
THIS IS REALLY A VERY SIMPLE MOVE AND LEAVES YOU WITH THE FEELING THAT YOU EXECUTED TIGER'S SWING. MINUTE CHANGES TO ACCURACY IS ACHIEVED BY APPLYING THE THEORY OF THE ISOSCELES TRIANGLE.
Sunday, November 19, 2006
Separation of Church and State
Like the law of separation of Church and State, there should also be a law of separation in the golf swing. First, let us identify the entities involved in golf - the big muscles and small muscles. Big muscles can be the shoulders while small muscles can be the hands. We can also refer to it as the upswing and the downswing. And the rule should be the "the muscles employed in the upswing should not be the same employed in the downswing."
Thursday, November 09, 2006
The Tiger swing - a modern Hogan version?
Have you noticed Tiger's swing? It is different from most of the professional golfers. He has a delayed shoulder jerk. His swing is not a normal pendulum swing. He seem to turn slowly and at the end gives his shoulders a jeck-like movement.
I tried simulating it in the driving range but the closest I can get to it is making a pronounced weight transfer to the right - by pushing the left shoulders in until the weight is on the right and the hands fully cocked - , then making a weight transfer to the left followed by the shoulders' hit. It is hard to incorporate naturally in the swing. I think the weight shift must be transferred to the upper body and at the downswing, the upper body fires first naturally. This is hard but it does look like this is the natural progression from what I have been learning in the previous posts.
I have not had the time but I think this is like the Hogan's knee swing or Nicklaus' rolling feet tip.
Well now that we have Tiger performing his swing at any time we want to, we can practically copy his swing. Watching him at perform the slo-mo way tells me that he has simplified his swing very much. This must be why he is so accurate. Notice his body twists like a book page flipping from the spine? He is not even minding his arms or the club - he just flips his shoulders to the top and let the club find its own way to the slot.
And how about the downswing. It is just the total left side simultaneously throwing its weight to the left side . Then, of course, the delayed socket-popping hit follows.
A very simple move indeed.
At the driving range, I tried to see if I can do Tiger's opening a page upswing and a delayed weight transfer first downswing. What became apparent is this might be really the Hogan swing except Hogan just got too technical in explaining his swing. I find that at address, I can visualize the plane, start the club with a little right hand flip of the club and bring the whole left side around the spine up to the top with the shoulders and arms following the plane. Downwards is the pronounced weight shift to the left with the delayed big hit immediately following. This is the Hogan swing masquerading as Tiger's!
During another session at the driving range, I noticed by concentrating on my left knee, I was able to put the club head right into the "slot" at the top - without much effort on my brain. Hitting the ball with the same left knee seems to have delayed the hit a little bit. What is important to remember in this paragraph is by "throwing" the club head with the left knee towards the 2:00 o'clock position, it made the upswing fall easily on a "groove" and it hit the slot smoothly - thereby, promoting a complete turn at the top.
I tried simulating it in the driving range but the closest I can get to it is making a pronounced weight transfer to the right - by pushing the left shoulders in until the weight is on the right and the hands fully cocked - , then making a weight transfer to the left followed by the shoulders' hit. It is hard to incorporate naturally in the swing. I think the weight shift must be transferred to the upper body and at the downswing, the upper body fires first naturally. This is hard but it does look like this is the natural progression from what I have been learning in the previous posts.
I have not had the time but I think this is like the Hogan's knee swing or Nicklaus' rolling feet tip.
Well now that we have Tiger performing his swing at any time we want to, we can practically copy his swing. Watching him at perform the slo-mo way tells me that he has simplified his swing very much. This must be why he is so accurate. Notice his body twists like a book page flipping from the spine? He is not even minding his arms or the club - he just flips his shoulders to the top and let the club find its own way to the slot.
And how about the downswing. It is just the total left side simultaneously throwing its weight to the left side . Then, of course, the delayed socket-popping hit follows.
A very simple move indeed.
At the driving range, I tried to see if I can do Tiger's opening a page upswing and a delayed weight transfer first downswing. What became apparent is this might be really the Hogan swing except Hogan just got too technical in explaining his swing. I find that at address, I can visualize the plane, start the club with a little right hand flip of the club and bring the whole left side around the spine up to the top with the shoulders and arms following the plane. Downwards is the pronounced weight shift to the left with the delayed big hit immediately following. This is the Hogan swing masquerading as Tiger's!
During another session at the driving range, I noticed by concentrating on my left knee, I was able to put the club head right into the "slot" at the top - without much effort on my brain. Hitting the ball with the same left knee seems to have delayed the hit a little bit. What is important to remember in this paragraph is by "throwing" the club head with the left knee towards the 2:00 o'clock position, it made the upswing fall easily on a "groove" and it hit the slot smoothly - thereby, promoting a complete turn at the top.
Monday, October 30, 2006
The Isosceles Triangle
Technically, the secret of the accuracy in all swings - whether it is the full swing or the putter - is to be able to return to the Isosceles Triangle at the point of impact. This explains what I discovered and presented in my last post. Let us review what an isosceles triangle is.
Here is another fallacy I have been advocating before, "The technique follows the same intention as the full swing - use the big muscles for consistent accuracy." Well not entirely wrong in a way - this statement is correct when you think of the putt as two pieces. The first is the big muscles; the second is a rebound with the absence of the big muscles. Sounds confusing isn't it?
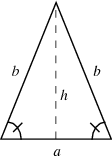
An isosceles triangle is a triangle with (at least) two equal sides. In the figure above, the two equal sides have length  and the remaining side has length
  . This property is equivalent to two angles of the triangle being equal. An isosceles triangle therefore has both two equal sides and two equal angles. The name derives from the Greek iso (same) and skelos (leg).
A triangle with all sides equal is called an equilateral triangle, and a triangle with no sides equal is called a scalene triangle. An equilateral triangle is therefore a special case of an isosceles triangle having not just two, but all three sides and angles equal. Another special case of an isosceles triangle is the isosceles right triangle.
For golf, let us not dwell on the other special isosceles triangle but just the one pictured above. Picture your shoulders as the side "a" and the sides "b" as the distance of both shoulders to the ball. On the upswing, the "b" sides will no longer be equal - the left getting longer and the right getting shorter. You can test this by facing both hands together and looking how the left hand gets shorter in relation to the right hand while moving the shoulders around and the arms moving up. What happens, technically speaking, is the face of the club or putter opens up. To get it back to the square position (the isosceles triangle), one has to let the shoulders wait for the hands to catch up at the point of impact.
Have you not noticed that when you really want to hammer the ball and let the body work more - the ball slices? Yes, that is the body not waiting for the arms (the other way around - hook - is possible but usually new golfers cannot do this). Now that you know the technical stuff, let us go to the practical side.
Here is another fallacy I have been advocating before, "The technique follows the same intention as the full swing - use the big muscles for consistent accuracy." Well not entirely wrong in a way - this statement is correct when you think of the putt as two pieces. The first is the big muscles; the second is a rebound with the absence of the big muscles. Sounds confusing isn't it?
- First, practice how hard you far you want the ball to go.
- When satisfied, lay down the club with the left hand roughly square to the target, both feet together.
- Start aiming the club to the target while the right hand joins in to fully grip the club.
- With both hands now on the club, finish the targeting of the putter face to the target.
- Once satisfied and while still looking at the target, move the feet apart for the proper stance.
- Start the back swing with shoulders up to the point you previously (first bullet) practiced.
- With the shoulders relaxing, let the putter bounce back with the arms guiding it back to the target.
- The isosceles triangle is achieved at point of impact - then becomes a scalene triangle again after impact. Note that the reverse scalene triangle happened at the upswing also.
Tuesday, October 24, 2006
Getting Really Technical
I just got back from a 5 day trip to Palm Coast, Florida. I played three golf games in three consecutive days. I took pictures of my friends' swings and ask them to take my picture too. After the game, while perusing my digital camera images, it became apparent that my finish form is not that good looking. My friend has a better looking form. That was the first day. Even though I was out driving my friend and out-scored him, I decided that his form will help me improve further.
The difference between my form and his is the finish of the swing. He turns his shoulders around and stays there even at the end of the swing while I seem to be standing up erect when I finish. On the second day, I decided to put that end of the swing form into mine. Disaster. I started pushing and fading my ball to the right. Although mostly serviceable, this was a night and day difference from the previous day where my ball is going straight to my target with a slight draw at times.
This effect made me to think and figure out why. There is a similarity to my putting - when I open my shoulders during the stroke, the ball goes right. The explanation is the face of the club or putter must be striking the ball with an open face. When you think about it, this is really what is happening. If you think of your shoulders as two points of a triangle and the third point is the club head, the distance of the shoulders to the club head must remain the same for both the time of set-up and the time of the hit. Opening the left shoulder makes the distance to the ball longer while the right shoulder's distance get shorter - the effect of which is an open club face. Vice-versa can happen too but seldom.
This said and proven, I reverted back to my old form and played happily ever after. By the way, this topic has a very important implication to putting. The face of the clock should be visualized, the shoulders turning like a pendulum, the force measured by the "hours" separating the backward and forward stroke - and all successfuly implemented to be able to putt straight.
The difference between my form and his is the finish of the swing. He turns his shoulders around and stays there even at the end of the swing while I seem to be standing up erect when I finish. On the second day, I decided to put that end of the swing form into mine. Disaster. I started pushing and fading my ball to the right. Although mostly serviceable, this was a night and day difference from the previous day where my ball is going straight to my target with a slight draw at times.
This effect made me to think and figure out why. There is a similarity to my putting - when I open my shoulders during the stroke, the ball goes right. The explanation is the face of the club or putter must be striking the ball with an open face. When you think about it, this is really what is happening. If you think of your shoulders as two points of a triangle and the third point is the club head, the distance of the shoulders to the club head must remain the same for both the time of set-up and the time of the hit. Opening the left shoulder makes the distance to the ball longer while the right shoulder's distance get shorter - the effect of which is an open club face. Vice-versa can happen too but seldom.
This said and proven, I reverted back to my old form and played happily ever after. By the way, this topic has a very important implication to putting. The face of the clock should be visualized, the shoulders turning like a pendulum, the force measured by the "hours" separating the backward and forward stroke - and all successfuly implemented to be able to putt straight.
Sunday, October 15, 2006
Putting
Putting is probably a very personal thing. It is so easy to do for everyone and you really need no skill to hammer a ball to the hole. This is the reason why no one will believe if I say follow this technique. What I will write here is my own, designed for me, works for me, and put in writing for me to remember.
The technique follows the same intention as the full swing - use the big muscles for consistent accuracy. It also use the grip techniques extensively. It is important to note the techniques employed here. It is like the grip I rated G-10. The right hand starts and then the focus is put on the left hand. The intent is to leave the right hand immobilized, the left hand in charge and the shoulder make the hit. Here is how I do mine.
Lay down the club with the right hand roughly square to the target. Now let the left hand cradle (literally cradle!) the club. The focus is still on the on the right hand until it is laying and sitted comfortably on the putter. Usually the right thumb should find itself on top of the flat spot of the putter grip. Now comes the finer aiming with the left hand. Once satisfied, the left hand pushes the putter head out and upwards (at around two o'clock) - the shoulder instinctively following. The forward motion is done with the turn of the shoulder.
Things to note: the big muscle is employed (shoulder); the cradle position of the left hand prevents fanning, same purpose for the full grip of the right resting on the putter grip. The last focus was on the left hand.
My major problems in putting are twofold: number one is my eyesight, I have a major case of astigmatism; second is my natural tendency to push the putter. Astigmatism is really bad because you see the ball where it is really not - your vision is distorted. I really on logical memory to sight the putter. Combine this with yips and it is disaster big time.
I am thinking of not fighting this and maybe working my handicap to my advantage. In order to do this, I will open my stance from now on. This thing works! Also, from now on, thinking the result is far more important than thinking shoulders, etc. This leaves everything to muscle memory, the ultimate golf skill! The putting procedure now should be:
All the above were written one year ago. It is amazing that when you find a golf secret, then you somehow also discover the key to somebody else's. Here is what I read about Lorena Ochoa how she won today the Samsung World Championship golf tournament.
"She got up this morning and went for a run and then was totally calm when she got to the golf course," said Dave Brooker, her caddie. The night before at the home of Tom and Kathy Mahoney and with the help of former Bel Air assistant pro Nick Bradley she worked on keeping her weight on her left leg during her putting stroke to avoid her tendency to lift her head back too soon and open the putter face.
Well I discovered the same thing in the past few days. My putts are going to the right because I do not stay still after I hit the ball, in effect, not following through. Another error is that I always imagine that the putter must stay square to the target when that is really impossible - it actually sends your ball to the right. If you try to push the ball to the target without a back stroke, you will know that you cannot do so with the putter face square. The putter face must close after hitting the ball - else it goes right.
The putting procedure now should be:
The technique follows the same intention as the full swing - use the big muscles for consistent accuracy. It also use the grip techniques extensively. It is important to note the techniques employed here. It is like the grip I rated G-10. The right hand starts and then the focus is put on the left hand. The intent is to leave the right hand immobilized, the left hand in charge and the shoulder make the hit. Here is how I do mine.
Lay down the club with the right hand roughly square to the target. Now let the left hand cradle (literally cradle!) the club. The focus is still on the on the right hand until it is laying and sitted comfortably on the putter. Usually the right thumb should find itself on top of the flat spot of the putter grip. Now comes the finer aiming with the left hand. Once satisfied, the left hand pushes the putter head out and upwards (at around two o'clock) - the shoulder instinctively following. The forward motion is done with the turn of the shoulder.
Things to note: the big muscle is employed (shoulder); the cradle position of the left hand prevents fanning, same purpose for the full grip of the right resting on the putter grip. The last focus was on the left hand.
My major problems in putting are twofold: number one is my eyesight, I have a major case of astigmatism; second is my natural tendency to push the putter. Astigmatism is really bad because you see the ball where it is really not - your vision is distorted. I really on logical memory to sight the putter. Combine this with yips and it is disaster big time.
I am thinking of not fighting this and maybe working my handicap to my advantage. In order to do this, I will open my stance from now on. This thing works! Also, from now on, thinking the result is far more important than thinking shoulders, etc. This leaves everything to muscle memory, the ultimate golf skill! The putting procedure now should be:
- Read the putt, decide on the break, and align the ball (with line) towards the target.
- Do several practice putts to get the feel for the length of the putt that is needed. Remember to the ball rolling there.
- With an open (including open shoulders), align the putter lines to the line on the ball, and repeat the same practice thought - move the ball to the target spot. Note that the shoulders should have taken over.
All the above were written one year ago. It is amazing that when you find a golf secret, then you somehow also discover the key to somebody else's. Here is what I read about Lorena Ochoa how she won today the Samsung World Championship golf tournament.
"She got up this morning and went for a run and then was totally calm when she got to the golf course," said Dave Brooker, her caddie. The night before at the home of Tom and Kathy Mahoney and with the help of former Bel Air assistant pro Nick Bradley she worked on keeping her weight on her left leg during her putting stroke to avoid her tendency to lift her head back too soon and open the putter face.
Well I discovered the same thing in the past few days. My putts are going to the right because I do not stay still after I hit the ball, in effect, not following through. Another error is that I always imagine that the putter must stay square to the target when that is really impossible - it actually sends your ball to the right. If you try to push the ball to the target without a back stroke, you will know that you cannot do so with the putter face square. The putter face must close after hitting the ball - else it goes right.
The putting procedure now should be:
- Read the putt, decide on the break.
- Do several practice putts to get the feel for the length of the putt that is needed. Remember to think the ball rolling there.
- Hold the putter with the left hand and aim.
- Try (only) to keep the shoulders and feet parallel to the target line.
- Bring the putter back with the left shoulder.
- Bring the putter forward with the left shoulder and instinctively letting the putter close after impact.
- Do not look for the ball - keep the eyes rooted to where the ball was at impact.
- Observe how the putter face naturally closes on the follow through.
Thursday, September 28, 2006
Divots
It is fortunate for the rich golfer who started in a country club. Here they started and practiced their golf swing on real turf. With them, they must have mimicked what they see on TV, the divots flying after every shot. Divots to them become second nature - their muscles always anticipating that dig-into-ground feeling.
Pity us poor golfers. We bought our first golf set from the "SALE" rack and can only practice the swing on a piece of carpet inside the bedroom. We even have to use the shortest club and purposely flatten the swing to avoid hitting the ceiling of the bedroom. Worse is we learned to instinctively jerked up the left shoulder after hitting the plastic ball lest we ruin our floor. It is not unusual that the Missus to find scratches on the floor and ceiling. On my case you can even find a hole in my dropped ceiling caused by the rubber trainer that is not suppose to fly out of the head of the club. I still wonder where that rubber trainer went when it created that hole. After thirty years + years, it has to be still in there.
Well it is time for me to learn to make a divot. I am still not a member of a country club so I cannot learn it from real turf. I must learn it on artificial turf in the driving range - I can afford that now... How do I do it, that is the question.
Pity us poor golfers. We bought our first golf set from the "SALE" rack and can only practice the swing on a piece of carpet inside the bedroom. We even have to use the shortest club and purposely flatten the swing to avoid hitting the ceiling of the bedroom. Worse is we learned to instinctively jerked up the left shoulder after hitting the plastic ball lest we ruin our floor. It is not unusual that the Missus to find scratches on the floor and ceiling. On my case you can even find a hole in my dropped ceiling caused by the rubber trainer that is not suppose to fly out of the head of the club. I still wonder where that rubber trainer went when it created that hole. After thirty years + years, it has to be still in there.
Well it is time for me to learn to make a divot. I am still not a member of a country club so I cannot learn it from real turf. I must learn it on artificial turf in the driving range - I can afford that now... How do I do it, that is the question.
Wednesday, September 27, 2006
Swing Check Points - the New Testament
Check points for a total body swing:
- Club set-up:
- The left hand holds the club while aiming to the target. The right hand then grips the club. Purpose: To ensure that one does not open up the shoulders while aiming.
- The shaft points to the left shoulder and aligned with the left arm which makes the right shoulder droop lower than the left shoulder. Purpose: This simulates the clubface allignment at the moment of impact.
- The arms are purposely held hanging straight down towards the ground, thereby, accentuating the drooping of the right shoulder plus there is a noticeable right angle created between the club and the arms. Purpose: The arms are hanged straight down and the club held almost at a right angle (almost cocked already) to promote the automatic cocking of the club. Like mentioned in the PLANE - cocking by the right hand along the plane should never be employed.
- Grip: The interlocked fingers are more in. The palms are facing each other where the left hand you may think is weak and the right hand may think is strong. The hands are felt as a one solid mass. The V of the right hand is felt more - to make the cocking easier and automatic. Purpose: Not too sure - ensures against fanning the clubface at the same time having a stronger grip? Or, maybe the grip works better with the chin-to-chin technique?
- Stiff right knee: The relative position of the right knee stays at right angle to the target line at all times during the backswing. Purpose: The same as the next one - accuracy and power.
- Flat foot stance: Ensure that both feet are planted on the ground securely. The left sole and heel only lifts up when pulled by the upper body, else it stays down. Purpose: To ensure that the club comes back consistently.
- Plane: DO NOT USE WHATSOEVER. Purpose: Shanks can easily happen when visualizing of the plane. Just stick to the chin-to-chin technique. However, although it is not conciously employed with this technique, the roundhouse swing of the shoulders functions the same way.
- Chin-to-chin: The left shoulder pushes the whole club away into a roundhouse motion until the left shoulder hits the chin. Then the roundhouse motion is brought down, around and through the ball - without stopping until the right shoulder hits the chin. Purpose: to make a complete pendulum swing for power and consistency.
Thursday, August 31, 2006
Swing Check Points - In the beginning...
- The flail, the flail.
- Club set-up: The club shaft points to the left shoulder and aligned with the left arm. Purpose: This simulates the clubface allignment at the moment of impact
- Grip: The thumb and foreginger pinches the shaft "actively" with the feeling that the club is to be taken initially by the hands toward the two o'clock position and eventually along the swing plane until the upper body is flexed. Purpose: To ensure that the hands start the swing and the clubface is not fanned open.
- Plane: The hands points at the bottom of the plane and takes the club head toward the two o'clock position and along the plane. Purpose: For fine targeting and accuracy.
- The left shoulder pushes the clubface along the target line at the start of the swing. Purpose: For accuracy - the proof is in the putt (use left shoulder also to bring the putter back).
- Coiled Upper Body - Upswing: The hands and arms bring the club up until the upper body is coiled to the maximum. Purpose: To make sure that shoulders are fully coiled and the power transferred to the upper body. This is the upswing of the flail technique so "feel" the flail with the left shoulder!
- Flat foot stance: Ensure that both feet are planted on the ground securely. The left sole and heel only lifts up when pulled by the upper body, else it stays down. Purpose: To ensure that the club comes back correctly and to maximize coiling of the upper body - for power.
- Stiff right knee: The relative position of the right knee stays at right angle to the target line at all times during the backswing. Purpose: The saem as no. 5 - accuracy and power.
- Coiled upper body - Downswing: Once the hands and arms have coiled the upper body, an entwined power is felt, and that coiled feeling is the one that hits the ball. Purpose: Delayed hit. This is the flail hitting the ball so "feel" the failing done by the left shoulder.
- Reverse C: The coiled feeling is imagined as going around and through the ball - which imparts more power. The right shoulder is way in front of the left shoulder at the finish position. Purpose: P-O-W-E-R.
Monday, August 21, 2006
Flat Footed Golfer?
With the golfer image that we always see on TV, we tend to imitate it so closely that we tend to pose like a golfer. One of the things I am sure I am guilty of is raising the left foot because that is how the pros look at the top of their swing - the left heel raised. But have we stopped and thought about how the pros got to that position? I "pose" to that position but the pros' left heel was pulled to that position - the difference is that they have the muscle tension but mine is just for show - no valid tension (in golf parlance) at all.
Maybe, for the neophytes in golf like me, we should just stay flat-footed on our backswing and let the tension happen by itself. As matter of fact, this flat-foot rule can be elevatedt to the same stutus as the rigid-right knee rule. Let us try this out for now.
Maybe, for the neophytes in golf like me, we should just stay flat-footed on our backswing and let the tension happen by itself. As matter of fact, this flat-foot rule can be elevatedt to the same stutus as the rigid-right knee rule. Let us try this out for now.
Subscribe to:
Posts (Atom)